Difference between revisions of "PDX2000 Firmware Upgrade"
From skratchtek
| Line 1: | Line 1: | ||
| − | The PDX2000 and PDX3000 turntables are very similar in terms of circuitry - really the only difference is in the main MCU. | + | The PDX2000/PDX2300 and PDX3000 turntables are very similar in terms of circuitry - really the only difference is in the main MCU. |
[https://www.youtube.com/watch?v=JjtfPExJrIE The main guide is in this video.] | [https://www.youtube.com/watch?v=JjtfPExJrIE The main guide is in this video.] | ||
| Line 22: | Line 22: | ||
** Make sure BOOT Mode and Use Default is selected, click next | ** Make sure BOOT Mode and Use Default is selected, click next | ||
** Click Finish | ** Click Finish | ||
| − | ** Download [http://rasteri.com/ | + | ** Download [http://rasteri.com/VestHax_v1.0.bin the modified PDX3000 firmware], and load it into the "User/Data Area" box of the Flash Development Toolkit |
** Click "Program Flash", it will take 10 seconds or so. | ** Click "Program Flash", it will take 10 seconds or so. | ||
** If all is ok, it will say "Image written to device" in green - if not, check your connections and soldering | ** If all is ok, it will say "Image written to device" in green - if not, check your connections and soldering | ||
Revision as of 08:08, 20 February 2022
The PDX2000/PDX2300 and PDX3000 turntables are very similar in terms of circuitry - really the only difference is in the main MCU.
The main guide is in this video.
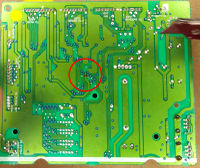
- Modify the main circuit board :
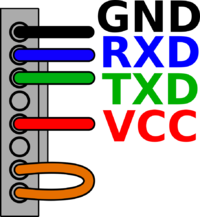
- Build a programming cable using an 8-pin JST PH connector and some dupont wires, this is the wiring for it :
- Connect a USB-TTL serial adapter to your PC, and connect it to JU05 (FLASH) on the Vestax PCB using the cable you just made
- Install the renesas flash tools - you want the "[Evaluation Software] Flash Development Toolkit V.4.09 Release 03"
- Run Flash Development Toolkit 4.09 Basic.
- Go to "Options->New Settings" (it might automatically do this the first time you start it)
- Type "H8/3052" in the filter box and select the first option in the list, click next
- Select the COM port of your USB serial adapter (you can find this in Device Manager), click next
- Set the CPU crystal frequency to 25MHz, click next
- Make sure BOOT Mode and Use Default is selected, click next
- Click Finish
- Download the modified PDX3000 firmware, and load it into the "User/Data Area" box of the Flash Development Toolkit
- Click "Program Flash", it will take 10 seconds or so.
- If all is ok, it will say "Image written to device" in green - if not, check your connections and soldering

